Free Crochet Pumpkin Pattern: Sizes for Cozy Decor
Free crochet pumpkin patterns are here to banish those bare surfaces and bring cozy autumn vibes to your home! Are you tired of that one awkward shelf that looks a little… empty? Or maybe a corner that just needs a touch of seasonal cheer? Well, imagine a charming collection of plump, crocheted pumpkins, each in its own unique size, gracing your mantelpiece, side tables, or even your kitchen counter. These adorable decorations can be made for next to nothing, using up leftover yarn scraps, and can be whipped up in just a couple of hours. In this article, I’ll guide you step-by-step through creating your very own set, no matter your crochet skill level. Get ready to learn how to stitch up a perfect pumpkin patch!
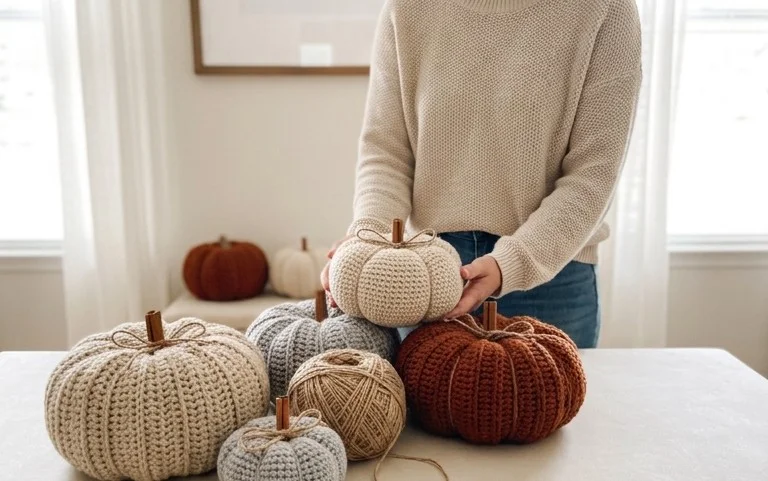
Cozy Up Your Home with Our Free Crochet Pumpkin Pattern in Six Sizes!
Fall is in the air, and there’s no better way to embrace the season than by bringing some cozy, handmade charm into your home. This year, I’m absolutely thrilled to share my free crochet pumpkin pattern, designed to create adorable pumpkins in six different sizes. From tiny tabletop accents to statement pieces that will wow your guests, these pumpkins are perfect for adding that festive, autumnal touch. And the best part? They’re incredibly versatile and require no drilling or permanent fixtures, making them ideal for renters and anyone who loves to redecorate frequently. Let’s get crafting!
What You’ll Need and a Rough Cost Estimate
The beauty of this project lies in its simplicity and affordability. You won’t need a massive shopping spree to get started. Here’s a breakdown of what you’ll need, with approximate costs:
* **Yarn:** The star of our pumpkin show! For this pattern, I recommend using a worsted-weight acrylic yarn. It’s durable, easy to care for, and comes in a stunning array of fall colors. You’ll need about 50-100 yards per pumpkin, depending on the size. For a set of six pumpkins in various sizes, budgeting around 500-700 yards in total is a good ballpark. A standard 100g skein of acrylic yarn typically costs between $4-$8. So, for all six, you’re looking at roughly $20-$56, depending on the yarn quality and sales you find. If you’re a yarn hoarder like me, you might already have plenty of stash-busting potential here!
* **Crochet Hook:** A 5mm (H-8) hook is perfect for worsted-weight yarn, creating a lovely, slightly dense fabric that holds its shape well. These hooks are generally inexpensive, usually ranging from $3-$7.
* **Fiberfill Stuffing:** To give your pumpkins their delightful plumpness, you’ll need fiberfill. A standard 16oz bag of polyester fiberfill usually costs around $5-$10 and will stuff many pumpkins.
* **Tapestry Needle:** For weaving in those yarn ends securely. A basic tapestry needle set is very affordable, around $2-$5.
* **Scissors:** Essential for cutting yarn. You likely already have these!
* **Optional: Stitch Marker:** Helpful for keeping track of your rounds, especially when you’re starting out. About $2-$4 for a set.
* **Optional: Embellishments:** For the stems, you can use brown or green yarn, a small piece of faux leather, or even a real twig! Button or embroidery floss for eyes if you’re making a cute character pumpkin. These add minimal cost, typically under $5.
**Rough Total Cost Estimate:** For a complete set of six pumpkins, you can expect to spend anywhere from $30 to $80, depending on your yarn choices and existing craft supplies. This is a fantastic value for the amount of decor you can create!
Measuring and Planning Before You Start
Before diving headfirst into crocheting, a little planning goes a long way. Think about where you envision your pumpkins gracing your home and what sizes would best complement those spaces.
* **Visualize Your Display:** Consider your entryway console, your coffee table, a mantelpiece, a bookshelf, or even a windowsill. Each location might benefit from a different pumpkin size.
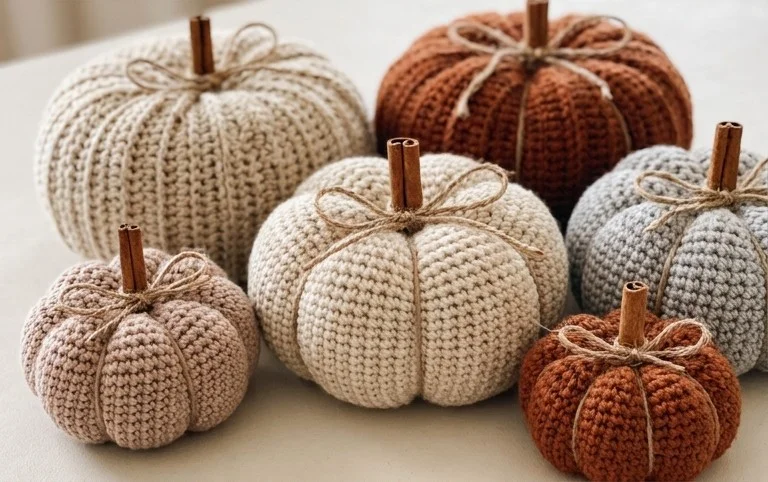
* **The Six Sizes:** My pattern provides instructions for six distinct sizes. Roughly, these will result in pumpkins with a circumference of approximately:
* Size 1: 6 inches (tiny, perfect for mini arrangements)
* Size 2: 8 inches
* Size 3: 10 inches
* Size 4: 12 inches
* Size 5: 15 inches
* Size 6: 18 inches (a real statement piece!)
* **Color Palette:** Think about your existing fall decor. Are you going for traditional oranges and browns? Or perhaps a more modern palette of creams, blush pinks, or even muted blues? Having a cohesive color scheme will make your pumpkins feel intentionally styled.
* **Stem Style:** Decide if you want traditional crocheted stems, or if you prefer the look of natural twigs or faux leather accents. This will inform your yarn choices or any additional craft supplies you might need.
Taking a moment to sketch out your ideas or even just mentally place the pumpkins in your space will help you make the most of your yarn and ensure you end up with a collection you absolutely love.
Your Step-by-Step Crochet Pumpkin Journey
This pattern is designed to be beginner-friendly, using basic crochet stitches. We’ll be working in the round.
1. **The Base:** We start by creating a flat circle. For all sizes, you will begin by chaining 2, then working a specific number of single crochet (sc) stitches into the first chain. The number of sc stitches varies by size to create the different base diameters. For example:
* Size 1: 6 sc in first chain.
* Size 6: 12 sc in first chain.
* *The pattern will specify the exact number for each size.*
2. **Increasing the Circle:** We then work increases in each round to grow the flat circle. A standard increase is working 2 sc in the same stitch. The pattern dictates how many increases and where to place them in each round to achieve the correct circumference for each size. We’ll typically alternate between making increases and single crochets in subsequent stitches to create a smooth, circular shape.
3. **Reaching the Full Diameter:** You’ll continue increasing until your flat circle reaches the desired diameter for your chosen pumpkin size. For example, a Size 1 pumpkin’s flat circle might be about 2 inches in diameter, while a Size 6 might be around 6 inches.
4. **Working Even:** Once the base reaches the specified diameter, we stop increasing and work single crochet stitches in each stitch around for a set number of rounds. This creates the sides of the pumpkin. The number of rounds determines the height of your pumpkin.
5. **Closing the Top:** After completing the side rounds, we’ll decrease to close the top of the pumpkin. This is done by working sc2tog (single crochet two together) stitches evenly around the round. You’ll continue decreasing until you have a small opening.
6. **Stuffing Time:** Before closing the opening completely, it’s time to add the stuffing! Pack it in firmly but evenly until your pumpkin has a nice, plump shape. Don’t be shy with the stuffing – it really gives the pumpkin its character.
7. **Cinched Closure:** Using your tapestry needle and a length of yarn, thread it through the remaining stitches of the top opening. Pull tightly to gather the opening closed, creating a lovely cinched effect. Secure the yarn firmly on the inside.
8. **Adding the Stem:** For a crocheted stem, you’ll typically work a few rounds of single crochet in brown or green yarn, creating a small tube, and then stitch it securely to the top center of your pumpkin. Alternatively, you can stitch on a pre-made embellishment or a natural twig.
9. **Weaving in Ends:** With your tapestry needle, carefully weave in any remaining yarn ends to ensure a neat and professional finish.
Styling Your Crochet Pumpkins with Flair
These crochet pumpkins aren’t just cute; they’re incredibly versatile for styling.
* **Color Coordination:** Group pumpkins of similar shades together for a sophisticated look. For a traditional vibe, mix different shades of orange, deep reds, and browns. For a modern farmhouse feel, opt for creams, whites, and soft grays.
* **Texture Play:** Combine your crochet pumpkins with other fall textures like chunky knit blankets, faux fur pillows, wooden bowls, and natural elements like pinecones or dried leaves. This layering adds depth and visual interest.
* **Arrangement Ideas:**
* **Entryway:** Line up a few larger pumpkins on a console table or a bench. Add a small vase of dried wildflowers or a stack of vintage books for a welcoming touch.
* **Coffee Table:** A cluster of 2-3 medium-sized pumpkins works beautifully. You can tuck in some acorns or a small bowl of potpourri.
* **Mantelpiece:** Drape a garland behind them, or place them amongst faux greenery and candles. Mix in some smaller pumpkins for variety.
* **Shelving:** Use the smaller pumpkins to fill gaps on bookshelves or display shelves.
* **Rental Friendly Decor:** Place them on tiered trays, inside decorative baskets, or on existing furniture. No need for nails or screws!
The key is to create vignettes that tell a story. Think about balance and height variation. Don’t be afraid to play around until it feels just right.
Keeping Your Crochet Pumpkins Tidy After Week One
One of the joys of these crochet pumpkins is how easy they are to maintain. After the initial week of adnon-alcoholic miring your handiwork, here’s how to keep them looking their best:
* **Dusting:** A gentle dusting with a soft cloth or a feather duster is usually all that’s needed. For more stubborn dust, a lint roller can be surprisingly effective on the crocheted texture.
* **Fluffing:** If a pumpkin starts to look a little saggy, simply give it a good squish and reshape it. The fiberfill will bounce back.
* **Spot Cleaning (if necessary):** For minor spills, you can spot clean with a damp cloth and a tiny amount of mild soap. Gently blot the area and allow it to air dry completely. Avoid soaking your pumpkins.
* **Storage:** When the season is over, gently fluff your pumpkins, ensure they are completely dry, and store them in a breathable bag (like a cotton tote) or a plastic bin to protect them from dust and pests. Avoid plastic wrap, which can trap moisture.
Common Mistakes That Can Make This Project Fail
While this pattern is forgiving, a few common pitfalls can lead to less-than-perfect pumpkins.
* **Tension Troubles:** Inconsistent tension is the nemesis of any crochet project. If your stitches are too loose, your pumpkin might be too floppy. If they’re too tight, it can be difficult to work the stitches, and your pumpkin might be smaller than intended. Aim for a consistent, medium tension.
* **Not Enough Stuffing:** This is a big one! Understuffing your pumpkin will result in a deflated, sad-looking creation. Be generous with the fiberfill to achieve that full, round shape.
* **Uneven Stuffing:** Conversely, overstuffing one side can make your pumpkin lopsided. Distribute the stuffing evenly as you fill it.
* **Incorrect Gauge (less critical here, but still):** While gauge isn’t as crucial for decorative items as it is for garments, drastically different yarn weights or hook sizes will affect the final dimensions and look. Stick to the recommended yarn weight and hook size for the best results.
* **Forgetting to Weave in Ends Properly:** Loose yarn tails can unravel over time or simply look untidy. Take the time to weave them securely into the fabric of your pumpkin.
* **Skipping the Stem Securely:** If your stem isn’t attached firmly, it can become a weak point. Take the time to stitch it on securely to ensure longevity.
Don’t let these potential hiccups deter you! Crochet is a journey, and every stitch is a learning opportunity. With a little patience and this easy-to-follow pattern, you’ll have a beautiful collection of crochet pumpkins to adorn your home all season long. Happy crocheting!
Conclusion
These charming crochet pumpkins can truly transform your living space, bringing a touch of cozy, handmade warmth that makes a difference day to day. Imagine the delight of spotting your unique creations as you pass through your home! Ready to start crafting? Your smallest, most impactful first step today could be as simple as pulling out your yarn and hook to create one mini pumpkin. If you’re looking for a different vibe, consider using natural twine for a rustic kitchen accent, or fabric scraps for a playful nursery display.
We hope this free crochet pumpkin pattern inspires you! Don’t stop here – there are so many more wonderful home decor and organization ideas waiting for you to discover.