Cricut Craft Room Tour: Easy Organization Ideas
Step inside this Cricut craft room and prepare to be inspired! Are you tired of craft supplies taking over your dining table, or that corner of the living room becoming a permanent craft disaster zone? I know I was! It’s a common frustration, trying to find a dedicated space for all those beautiful papers, tools, and ongoing projects. This transformed space, however, is a haven of order and creativity. Imagine a beautifully organized room where everything has its place, from your Cricut machine to your favorite vinyl rolls, making crafting a joy, not a chore. We achieved this stunning makeover for around $300 in just a weekend, proving that incredible organization is within reach! In this tour, I’ll share exactly how we tackled the clutter, the clever storage solutions we implemented, and how you can replicate this calm and functional craft sanctuary in your own home. Get ready to reclaim your space and elevate your crafting experience!
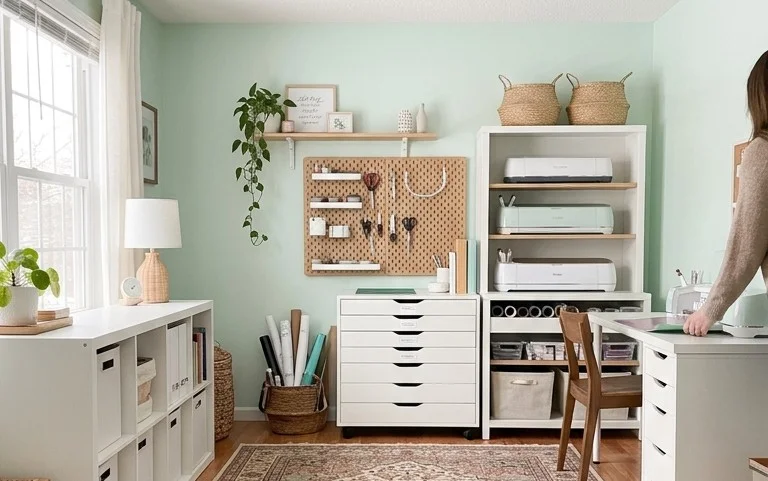
Step Inside My Cricut Craft Room: A Tour and How to Create Your Own Oasis
Let’s face it, as Cricut enthusiasts, our craft supplies can multiply faster than rabbits! Before you know it, those beautiful rolls of vinyl are tumbling out of boxes, your heat press is precariously balanced on a stack of cardstock, and your favourite cutting mats have mysteriously vanished. If this sounds familiar, then it’s time to carve out a dedicated space for your creative passion. Today, I’m thrilled to invite you into my own Cricut craft room and guide you through the process of creating your very own organized, inspiring haven.
What You’ll Need and What it Might Cost
Embarking on a craft room makeover doesn’t have to break the bank. The key is to prioritize functionality and invest in items that will truly enhance your crafting experience. Here’s a breakdown of essentials and their approximate costs:
* **Storage Solutions:** This is paramount. Think shelving units, drawer cabinets, wall-mounted organizers, and clear bins. For a medium-sized room (say, a 10ft x 10ft spare bedroom), you might consider a large Kallax-style shelving unit from IKEA (around £100-£150), a set of three narrow drawer cabinets (like MALM from IKEA, £60-£90 total), and a variety of clear acrylic bins for smaller items (expect to spend £50-£100 depending on quantity and size). Wall-mounted pegboards with accessories can range from £30-£70.
* **Workspace:** A sturdy desk or table is non-negotiable. A simple but robust desk can be found for £80-£200. If you have a larger space, a craft table or workbench might be ideal, costing anywhere from £150-£400.
* **Lighting:** Good lighting is crucial for detailed work and reducing eye strain. A bright overhead fixture is a good start (£30-£70), but consider adding a desk lamp with adjustable brightness and colour temperature (£25-£50) and perhaps some accent lighting or LED strip lights for ambiance (£20-£40).
* **Comfort:** An ergonomic chair is a worthy investment for those long crafting sessions (£70-£150).
* **Decor and Organization Accessories:** This is where your personality shines! Wall art, plants, decorative bins, label makers, and specialized holders for tools can add up. Budget around £50-£100 for these finishing touches.
**Rough Total Estimate:** For a functional and attractive craft room of around 100 sq ft, you’re likely looking at an initial investment of £400-£1000, depending on your choices and how much you can repurpose existing furniture. Remember, you can always build and refine over time.
Measuring and Planning: The Foundation of Success
Before you even think about buying storage, grab your trusty measuring tape. This is the most critical step to avoid costly mistakes and ensure your space is optimized.
* **Measure Your Space:** Note the dimensions of your room: length, width, and height. Also, measure any existing furniture you plan to keep, windows, doors, and power outlets. Sketching a rough floor plan on graph paper (1 square = 1 foot is a good rule of thumb) will be incredibly helpful.
* **Identify Your Needs:** What types of crafts do you do most? Do you need a dedicated space for heat pressing, or is vinyl and paper crafting your primary focus? How much vinyl do you typically have on hand? Do you have a lot of cutting mats? Knowing your needs will dictate the type and amount of storage you require.
* **Prioritize Workflow:** Think about how you use your space. Where do you typically unroll vinyl? Where do you cut? Where do you weed? Aim to arrange your workspace so these tasks flow logically. Keep frequently used items within easy reach.
* **Consider Power Access:** Make sure your planned layout allows for easy access to power outlets for all your Cricut machines, heat press, and lighting. Avoid placing furniture in front of crucial outlets.
Your Craft Room Transformation: A Step-by-Step Walkthrough
Now, let’s get down to the nitty-gritty of transforming your space.
1. **Declutter and Purge:** Before anything else, take everything out of the area you plan to dedicate to your craft room. Be ruthless. If you haven’t used it in a year, consider donating or selling it. This is your chance for a fresh start.
2. **Clean and Prepare:** Once the space is empty, give it a thorough clean. Fresh paint can work wonders to brighten and personalize the room.
3. **Position Your Workspace:** Decide on the best location for your desk or main crafting table. Consider natural light and proximity to power outlets.
4. **Assemble and Place Storage:** This is where your planning comes in. Assemble your shelving units and drawer cabinets. Place them strategically around your workspace. Ensure they are stable and secure.
5. **Install Wall Storage (If Applicable):** If you’re using pegboards or wall shelves, install them now. Make sure they are mounted securely into studs for maximum support.
6. **Organize Your Supplies:** This is the fun part!
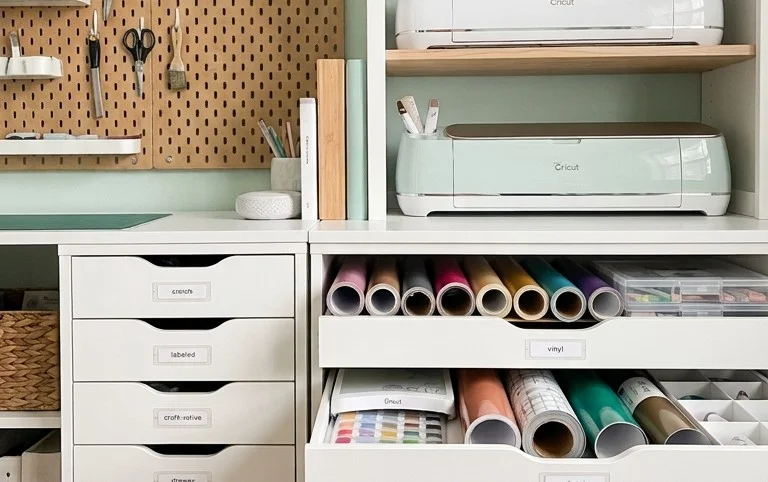
* **Vinyl:** Use vertical storage solutions like dedicated vinyl roll holders or slot organizers. For smaller scraps, clear bins are excellent.
* **Cardstock and Paper:** Magazine holders or upright file sorters are perfect for keeping cardstock neat and accessible.
* **Tools:** Use drawers with dividers for smaller tools like weeding tools, tweezers, and scissors. Pegboards are fantastic for hanging frequently used tools like your Cricut tools.
* **Cutting Mats:** Store them vertically in a dedicated mat holder or lean them against a wall within your shelving unit.
* **Heat Press and Accessories:** Designate a stable, heat-resistant surface for your heat press. Store transfer paper, heat-resistant tape, and other accessories in nearby drawers or bins.
* **Finished Projects:** Have a designated shelf or area for completed projects you’re proud of or need to store temporarily.
7. **Set Up Your Lighting:** Install your overhead light, position your desk lamp, and add any accent lighting.
8. **Add Personal Touches:** Hang your favourite artwork, add some plants, and arrange any decorative items.
9. **Test Everything:** Turn on your machines, test your lighting, and make sure everything is working as it should.
Adapting for Small Spaces or Rentals: Drilling Not Required!
Don’t have a dedicated room or the luxury of drilling into walls? No problem!
* **Use Vertical Space Creatively:** Look for freestanding shelving units that don’t require wall mounting. Tension rod shelves can create extra storage in existing closets.
* **Freestanding Organizers:** Rolling carts with multiple drawers are incredibly versatile and can be moved around as needed. Cube storage units are also excellent and can be combined in various configurations.
* **Command Hooks and Strips:** These are your best friends in a rental! Use them to hang lightweight organizers, tools, and even small shelves. They hold surprisingly well and remove cleanly.
* **Over-the-Door Organizers:** These can be used for storing vinyl rolls, small tools, or even finished projects.
* **Desk and Tabletop Solutions:** Invest in stackable drawers, desktop organizers, and wall-mounted file holders that can be attached to the side of your desk.
Styling Notes: Making it Beautiful and Functional
A craft room should be a place that inspires you. Here are some styling tips to keep it looking good and feeling functional:
* **Colour Palette:** I love a bright and airy feel. My craft room is primarily white with pops of pastel colours like mint green and blush pink. This keeps the space feeling open and cheerful. However, if you prefer a moodier aesthetic, a deep teal or a soft grey can also be very calming and sophisticated.
* **Texture:** Introduce texture through different materials. Natural wood accents, woven storage baskets, and soft textiles (like a small rug under your desk) add warmth and depth.
* **Strategic Placement:**
* **Cricut Machines:** Keep your most-used Cricut machine (usually the Explore or Maker) on your main desk or a nearby sturdy surface. Store less frequently used machines (like the Joy) on a shelf.
* **Vinyl Rolls:** Organize by colour or type. Keep your most popular colours at eye level for easy access.
* **Tools:** Hang frequently used tools on a pegboard within arm’s reach of your workspace. Store smaller, specialized tools in labeled drawers.
* **Cardstock:** Keep it upright and organized by colour or finish in magazine holders or cube storage.
* **Heat Press:** Ensure it’s on a dedicated, stable surface with plenty of ventilation.
* **Inspiration:** Display inspirational quotes, favourite finished projects, or mood boards on your walls.
Keeping it Tidy After Week One: The Long-Term Game
The initial organized bliss can sometimes fade. Here’s how I maintain order:
* **The “One In, One Out” Rule:** For supplies, try to adopt this principle. When you buy a new roll of vinyl, consider finishing up or donating a similar colour you already have.
* **Daily Tidy-Up:** Dedicate 5-10 minutes at the end of each crafting session to put things back in their designated homes. This is far easier than a major overhaul later.
* **Weekly Deep Dive:** Once a week, take a slightly longer look. Re-fold any stray papers, wipe down surfaces, and check if any bins are overflowing.
* **Label Everything:** Labels are your secret weapon. They make it easy to find what you need and, more importantly, to put things back correctly.
* **Regular Purges:** Every few months, do a mini-declutter. Reassess what you’re using and what’s just taking up space.
The Mistakes That Make This Fail
Even with the best intentions, some common pitfalls can derail your craft room organization:
* **Overbuying Storage:** It’s tempting to buy every storage solution you see, but if it doesn’t fit your actual needs or your space, it becomes clutter itself. Plan first, buy second.
* **Not Enough Workspace:** Trying to craft on a tiny table when you need space to spread out materials is frustrating and inefficient. Prioritize a decent-sized workspace.
* **Poor Lighting:** Crafting in dim light leads to mistakes, eye strain, and a general lack of enjoyment. Invest in good lighting.
* **Ignoring Workflow:** If your supplies are scattered and your machines are in awkward places, your crafting will feel disjointed and time-consuming. Think about how you move and work.
* **Not Committing to Maintenance:** The biggest mistake is thinking the job is done once everything is in place. Regular tidying and purging are essential for long-term success.
Creating a dedicated Cricut craft room is more than just organizing supplies; it’s about creating a space where your creativity can truly flourish. By planning carefully, investing wisely, and maintaining your system, you can transform any corner into your personal crafting paradise. Happy crafting!
Conclusion
Stepping into a beautifully organized and personalized Cricut craft room isn’t just about aesthetics; it truly transforms your creative process day to day. Imagine the joy of effortlessly finding every tool, the inspiration flowing freely, and the sheer pleasure of a dedicated space that fuels your passion. You don’t need a massive renovation to begin experiencing this magic. Your smallest first step today could be as simple as clearing one shelf or a small drawer and assigning a home for your most-used Cricut supplies.
Alternative Ideas:
If a full craft room isn’t feasible, consider a dedicated corner in your living room with stylish storage bins, or transform a small closet into a compact creative nook.
We hope this tour has inspired you to create your own haven. Keep exploring for more ideas to bring order and beauty to your creative life!
